Ultima modifica da un moderatore:
Hello guys,
This tutorial is about how to make a trainer
This tutorial is about how to make a trainer
[Chapters Info]
- Creating a simple Design.
- Improving our design and adding Functions of the trainer.
- Adding a Picture and Audio.
- How to make our Trainer Undetected.
[F.A.Q]
Q.How Can I find Address With Cheat Engine?
A.
Q.When I press find out what writes to this address s4 crashes?
A.Change the debugger.
Q.How can I change the debugger?
A.Go to Edit, Settings, Debugger Options, and use VEH Debugger.
Chapter 1
Q.How Can I find Address With Cheat Engine?
A.
Q.When I press find out what writes to this address s4 crashes?
A.Change the debugger.
Q.How can I change the debugger?
A.Go to Edit, Settings, Debugger Options, and use VEH Debugger.
Chapter 1
GUI
What is GUI :
Graphical User Interface, It’s a user interface based on graphics like; icons, pictures and menus, instead of text.
Introduction
This post is just the basics of Autoit, by the end of this tutorial you will be able to create a simple trainer.
You Need Autoit, and you can find autoit by visiting AutoIt Downloads - AutoItScript and download the latest version and installing it.
__________________________________________________ __________________________________________________ __________________You Need Autoit, and you can find autoit by visiting AutoIt Downloads - AutoItScript and download the latest version and installing it.
Before reading the tutorial, is there an easy way to get the dimensions, you can find them by Koda Form Designer and you can get that from here.
Lesson 1
Creating a folder
Create a new folder anywhere you would like.
Creating a .au3 file
Create a new .au3 file by clicking the right mouse button, selecting new ->, and pressing the Autoit V3 Script.

Name the file
Just Name it any name, I named it Epvp Tutorial.
Edit the .au3 file
Right click the script and click on Edit.
Adding good header
Usually you have this header, replace "Myname" with your name in front of Author.
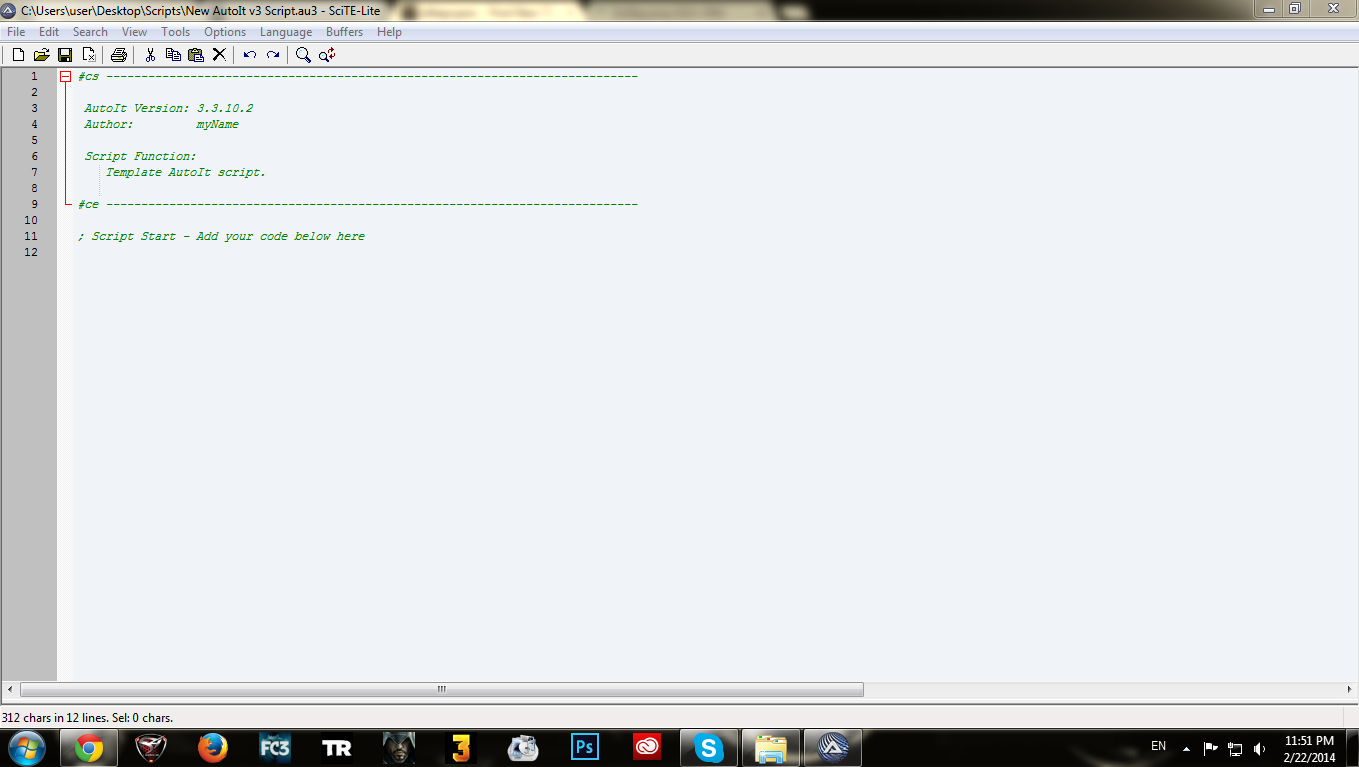
If you do not have this header here it is :
Code:
#cs ----------------------------------------------------------------------------
AutoIt Version: 3.3.10.2
Author: myName
Script Function:
Template AutoIt script.
#ce ----------------------------------------------------------------------------
; Script Start - Add your code below here
CS stands for comment start and indicates the beginning of a comment. there are a lot of dashes up there, they are not important actually they just look nice after all.
CE stands for comment end, and it is the final end of the comment.
Importing the GUI features
In order to show a GUI, you must add some functions so autoit can recognize and can Import the GUI features you use
Code:
#cs ----------------------------------------------------------------------------
AutoIt Version: 3.3.10.2
Author: myName
Script Function:
Template AutoIt script.
#ce ----------------------------------------------------------------------------
; Script Start - Add your code below here
#include <GUIConstantsEx.au3>
GUISetState(@SW_SHOW)
GUISetState : This function makes your program appear whenever you run it.
Structures of the program
In order to make the structure in other words the frame, you should add this functionCode:
GUICreate( "title" , width , height)
GUICreate : It is easy to recognize I think, You know GUI, and Create.
Replace the Title with the name of the program, and the dimensions are the width and the height which is easy to figure out, ill choose the width of 400 and the height of 200, and the name will be Siktor's Tutorial, so the codes will look like this :Code:
#cs ----------------------------------------------------------------------------
AutoIt Version: 3.3.10.2
Author: Siktor
Script Function:
Template AutoIt script.
#ce ----------------------------------------------------------------------------
; Script Start - Add your code below here
#include <GUIConstantsEx.au3>
GUICreate("Siktor's Tutorial", 400, 200)
GUISetState(@SW_SHOW)
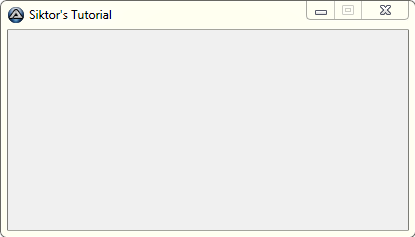
So now we have created our frame, but if you wanna try to open that frame to take a look on it, it will automatically dis appear 1 second after running it, do not worry, you didn't do anything wrong, in order to show it you have to add this function at the end of your codes :
Code:
While 1
sleep(1)
WEnd
Now simply click on F5 Button it should look like this :
Create a new folder anywhere you would like.
Creating a .au3 file
Create a new .au3 file by clicking the right mouse button, selecting new ->, and pressing the Autoit V3 Script.

Name the file
Just Name it any name, I named it Epvp Tutorial.
Edit the .au3 file
Right click the script and click on Edit.
Adding good header
Usually you have this header, replace "Myname" with your name in front of Author.

If you do not have this header here it is :
Code:
#cs ----------------------------------------------------------------------------
AutoIt Version: 3.3.10.2
Author: myName
Script Function:
Template AutoIt script.
#ce ----------------------------------------------------------------------------
; Script Start - Add your code below here
CS stands for comment start and indicates the beginning of a comment. there are a lot of dashes up there, they are not important actually they just look nice after all.
CE stands for comment end, and it is the final end of the comment.
Importing the GUI features
In order to show a GUI, you must add some functions so autoit can recognize and can Import the GUI features you use
Code:
#cs ----------------------------------------------------------------------------
AutoIt Version: 3.3.10.2
Author: myName
Script Function:
Template AutoIt script.
#ce ----------------------------------------------------------------------------
; Script Start - Add your code below here
#include <GUIConstantsEx.au3>
GUISetState(@SW_SHOW)
GUISetState : This function makes your program appear whenever you run it.
Structures of the program
In order to make the structure in other words the frame, you should add this functionCode:
GUICreate( "title" , width , height)
GUICreate : It is easy to recognize I think, You know GUI, and Create.
Replace the Title with the name of the program, and the dimensions are the width and the height which is easy to figure out, ill choose the width of 400 and the height of 200, and the name will be Siktor's Tutorial, so the codes will look like this :Code:
#cs ----------------------------------------------------------------------------
AutoIt Version: 3.3.10.2
Author: Siktor
Script Function:
Template AutoIt script.
#ce ----------------------------------------------------------------------------
; Script Start - Add your code below here
#include <GUIConstantsEx.au3>
GUICreate("Siktor's Tutorial", 400, 200)
GUISetState(@SW_SHOW)
So now we have created our frame, but if you wanna try to open that frame to take a look on it, it will automatically dis appear 1 second after running it, do not worry, you didn't do anything wrong, in order to show it you have to add this function at the end of your codes :
Code:
While 1
sleep(1)
WEnd
Now simply click on F5 Button it should look like this :

Lesson 2
Adding a label
Label is text, in order to create a label we use this code
Code:
GUICtrlCreateLabel ( "text", left, top)
Text : Is the text written in the label.
Left : The left side of the control, in other words the horizontal position.
Top : The top of the control, in other words the vertical position of where the text will be placed.
So ill put the left of 360, top of 176, and name it Siktor.
Final Code :Code:
#cs ----------------------------------------------------------------------------
AutoIt Version: 3.3.10.2
Author: Siktor
Script Function:
Template AutoIt script.
#ce ----------------------------------------------------------------------------
; Script Start - Add your code below here
#include <GUIConstantsEx.au3>
GUICreate( "Siktor's Tutorial" , 400 , 200)
GUICtrlCreateLabel ( "Siktor",360 ,176 )
GUISetState(@SW_SHOW)
While 1
sleep(1)
WEnd
Final Look :

Adding A Check Box
Now we have a Structure with a Label, but ain't enough, so now we will add a check box, we will use this code :
Code:
GUICtrlCreateCheckbox ( "text", left, top )
Text : Is the name of the check box.
Left : Is the The left side of the control, in other words the horizontal position.
Top : The top of the control, in other words the vertical position.
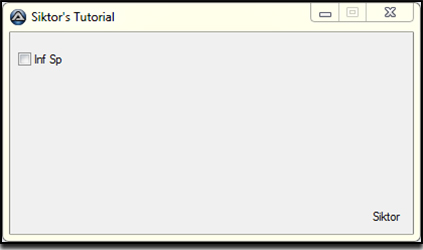
Ill name it Inf Sp, set the left to 8, and the top to 16.
Final code :
Code:
#cs ----------------------------------------------------------------------------
AutoIt Version: 3.3.10.2
Author: Siktor
Script Function:
Template AutoIt script.
#ce ----------------------------------------------------------------------------
; Script Start - Add your code below here
#include <GUIConstantsEx.au3>
GUICreate( "Siktor's Tutorial" , 400 , 200)
GUICtrlCreateLabel ( "Siktor",360 ,176 )
GUICtrlCreateCheckbox ( "Inf Sp", 8, 16 )
GUISetState(@SW_SHOW)
While 1
sleep(1)
WEnd
Final Look :
Adding a Button
We are doing great till now, and we will have the last part in Chapter one, and then we will go to Chapter 2 Which has the functions of the trainer, chapter one was all about the Structure and the stuff inside it, in other words the design
 , in order to add a button we will use this code :
Code:
GUICtrlCreateButton ( "text", left, top )
Text : The Name of the Button.
Left : The Horizontal Position.
Top : The Vertical Position.
So why don't we name it Start, Top will be at 48, and the left will be 136.
Final Code :Code:
#cs ----------------------------------------------------------------------------
AutoIt Version: 3.3.10.2
Author: myName
Script Function:
Template AutoIt script.
#ce ----------------------------------------------------------------------------
; Script Start - Add your code below here
#include <GUIConstantsEx.au3>
GUICreate( "Siktor's Tutorial" , 400 , 200)
GUICtrlCreateLabel ( "Siktor",360 ,176 )
GUICtrlCreateButton ( "Start", 136, 48 )
GUISetState(@SW_SHOW)
While 1
sleep(1)
WEnd
Final Look :
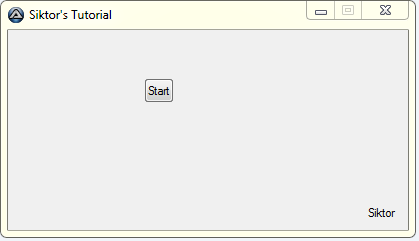
You noticed that the button is to small, that will be fixed in Chapter 2.
Now Let's name our Structure, Label, Button, and Checkbox, so this is our code :Code:
#cs ----------------------------------------------------------------------------
AutoIt Version: 3.3.10.2
Author: myName
Script Function:
Template AutoIt script.
#ce ----------------------------------------------------------------------------
; Script Start - Add your code below here
#include <GUIConstantsEx.au3>
GUICreate( "Siktor's Tutorial" , 400 , 200)
GUICtrlCreateLabel ( "Siktor",360 ,176 )
GUICtrlCreateButton ( "Start", 136, 48 )
GUISetState(@SW_SHOW)
While 1
sleep(1)
WEnd
So we are going to add $Name = Before any GUICREATE, so for example I want to name the GUI, Form1, it will be like this :
Code:
$Form1 = GUICreate( "Siktor's Tutorial" , 400 , 200)
So is this important?
Yes it is, you will see in the next Chapter how it is useful

Ill Name the GUI Form1, button will be named $Button1, Checkbox will be $Checkbox1, and the label will be $label1
Label is text, in order to create a label we use this code
Code:
GUICtrlCreateLabel ( "text", left, top)
Text : Is the text written in the label.
Left : The left side of the control, in other words the horizontal position.
Top : The top of the control, in other words the vertical position of where the text will be placed.
So ill put the left of 360, top of 176, and name it Siktor.
Final Code :Code:
#cs ----------------------------------------------------------------------------
AutoIt Version: 3.3.10.2
Author: Siktor
Script Function:
Template AutoIt script.
#ce ----------------------------------------------------------------------------
; Script Start - Add your code below here
#include <GUIConstantsEx.au3>
GUICreate( "Siktor's Tutorial" , 400 , 200)
GUICtrlCreateLabel ( "Siktor",360 ,176 )
GUISetState(@SW_SHOW)
While 1
sleep(1)
WEnd
Final Look :

Adding A Check Box
Now we have a Structure with a Label, but ain't enough, so now we will add a check box, we will use this code :
Code:
GUICtrlCreateCheckbox ( "text", left, top )
Text : Is the name of the check box.
Left : Is the The left side of the control, in other words the horizontal position.
Top : The top of the control, in other words the vertical position.
Ill name it Inf Sp, set the left to 8, and the top to 16.
Final code :
Code:
#cs ----------------------------------------------------------------------------
AutoIt Version: 3.3.10.2
Author: Siktor
Script Function:
Template AutoIt script.
#ce ----------------------------------------------------------------------------
; Script Start - Add your code below here
#include <GUIConstantsEx.au3>
GUICreate( "Siktor's Tutorial" , 400 , 200)
GUICtrlCreateLabel ( "Siktor",360 ,176 )
GUICtrlCreateCheckbox ( "Inf Sp", 8, 16 )
GUISetState(@SW_SHOW)
While 1
sleep(1)
WEnd
Final Look :

Adding a Button
We are doing great till now, and we will have the last part in Chapter one, and then we will go to Chapter 2 Which has the functions of the trainer, chapter one was all about the Structure and the stuff inside it, in other words the design

Code:
GUICtrlCreateButton ( "text", left, top )
Text : The Name of the Button.
Left : The Horizontal Position.
Top : The Vertical Position.
So why don't we name it Start, Top will be at 48, and the left will be 136.
Final Code :Code:
#cs ----------------------------------------------------------------------------
AutoIt Version: 3.3.10.2
Author: myName
Script Function:
Template AutoIt script.
#ce ----------------------------------------------------------------------------
; Script Start - Add your code below here
#include <GUIConstantsEx.au3>
GUICreate( "Siktor's Tutorial" , 400 , 200)
GUICtrlCreateLabel ( "Siktor",360 ,176 )
GUICtrlCreateButton ( "Start", 136, 48 )
GUISetState(@SW_SHOW)
While 1
sleep(1)
WEnd
Final Look :

You noticed that the button is to small, that will be fixed in Chapter 2.
Now Let's name our Structure, Label, Button, and Checkbox, so this is our code :Code:
#cs ----------------------------------------------------------------------------
AutoIt Version: 3.3.10.2
Author: myName
Script Function:
Template AutoIt script.
#ce ----------------------------------------------------------------------------
; Script Start - Add your code below here
#include <GUIConstantsEx.au3>
GUICreate( "Siktor's Tutorial" , 400 , 200)
GUICtrlCreateLabel ( "Siktor",360 ,176 )
GUICtrlCreateButton ( "Start", 136, 48 )
GUISetState(@SW_SHOW)
While 1
sleep(1)
WEnd
So we are going to add $Name = Before any GUICREATE, so for example I want to name the GUI, Form1, it will be like this :
Code:
$Form1 = GUICreate( "Siktor's Tutorial" , 400 , 200)
So is this important?
Yes it is, you will see in the next Chapter how it is useful

Ill Name the GUI Form1, button will be named $Button1, Checkbox will be $Checkbox1, and the label will be $label1
The End of Chapter 1, so we've finished our Design/Structure.
Chapter 2
Chapter 2
Better Design/Trainer Funcions
Introduction
So In chapter one we've learnt the basics, and how to create our design, the features of this Chapter are :
- Better Design.
- Function of the Trainer.
In order to design the hack easily you can use Koda Form Designer, download in chapter one.
__________________________________________________ __________________________________________________ __________________
So you wonder how to use Koda FD, you can search on google for tutorials or watch this video (Video Not By ME!)
Lesson 1
So Create your design in Koda, and copy the codes paste em in autoit and lets add the function. [You Should Learn Koda from Google, or the video I gave you if you have a brain
 ]
]
In the koda codes there are some differences in the chapter 1 codes and the koda codes, but no problem we will be using the Koda Codes.
The Differences are in the Includes, it is auto named, and the part from the While 1 till the WEnd, here are my codes :
Code:
#include <GUIConstantsEx.au3>
#Region ### START Koda GUI section ### Form=
$Form1 = GUICreate("Siktor's Tutorial", 266, 69, 192, 124)
$Label1 = GUICtrlCreateLabel("Made By Siktor", 184, 8, 76, 17)
$Checkbox1 = GUICtrlCreateCheckbox("Inf Sp", 8, 8, 97, 17)
$Button1 = GUICtrlCreateButton("Start", 8, 32, 251, 25)
GUISetState(@SW_SHOW)
#EndRegion ### END Koda GUI section ###
While 1
$nMsg = GUIGetMsg()
Switch $nMsg
Case $GUI_EVENT_CLOSE
Exit
EndSwitch
WEnd
Add the our header before the beginning of the codes, and ill explain the most effective difference here,
See the Case $BUI_EVENT_CLOSE_Exit, is the function of the Close button on the top right which makes it when you press it close.
Main Lesson/Adding a new Include
Now let's start the main lesson, you will need Nomad Memory.au3, you gonna download it and put it in the includes folder in the Autoit Folder, and add a new Include which is
Code:
#Include <nomadmemory.au3>
Adding a Function for the Button
If you click on the button it won't do anything :/, so let's add a function for it,
In the While 1 Part, add this code after the Exit :Code:
Case $Button1
So if you noticed that we Used its name that is why naming is important.
Tip : If you want to add a simple function, like a Message Box, you can just put its code under the Case $Button1, since it doesn't have a lot of words and simple, but if you want to add a lot of functions like a message box, check box's function 2, and other functions like tool tip you better do what I am going to do in Section 2.
Section 1 - Simple Button Function
Under the Case $Button1, if you want for example to add a message box, you are going to add this code :
Code:
MsgBox ( flag, "title", "text" )
Flag : The flag indicates the type of message box and the possible button combinations. See remarks.
Title : The title of the message box.
Text : The text of the message box.
What is a Message box?
It is a pop-up message that tells you something.
Ill choose the flag 0, the tittle will be Attention, and the text is hacked, so our codes will look like this :
Code:
#cs ----------------------------------------------------------------------------
AutoIt Version: 3.3.10.2
Author: Siktor
Script Function:
Template AutoIt script.
#ce ----------------------------------------------------------------------------
#include <nomadmemory.au3>
#include <GUIConstantsEx.au3>
#Region ### START Koda GUI section ### Form=
$Form1 = GUICreate("Siktor's Tutorial", 266, 69, 192, 124)
$Label1 = GUICtrlCreateLabel("Made By Siktor", 184, 8, 76, 17)
$Checkbox1 = GUICtrlCreateCheckbox("Checkbox1", 8, 8, 97, 17)
$Button1 = GUICtrlCreateButton("Start", 8, 32, 251, 25)
GUISetState(@SW_SHOW)
#EndRegion ### END Koda GUI section ###
While 1
$nMsg = GUIGetMsg()
Switch $nMsg
Case $GUI_EVENT_CLOSE
Exit
Case $Button1
MsgBox ( 0, "Attention", "Hacked" )
EndSwitch
WEnd
Note : If you want to test it click on F5 and click on the button

Section 2 - Advanced Button Function
We've added simple function which was only a simple Message Box, now let's add a multi-function, underCase $Button1 type this : _a word(), of course we will not write a word, by a word here I mean any word like for E.x : hack, so we will write it like this _hack(), if you would like it another word do it the word you like, but I'll use hack, now under WEnd Press enter to go one line do (if you want it more organized press enter to times so you would be far from the WEnd) now type this : Func _hack(), so here we are going to type the function, of course Func stands for function and the _hack() the word a chose, if you have chose another work like _start() so it will be Func _start(), press enter after Func _hack(), so our code will look like this :Code:
#cs ----------------------------------------------------------------------------
AutoIt Version: 3.3.10.2
Author: Siktor
Script Function:
Template AutoIt script.
#ce ----------------------------------------------------------------------------
#include <nomadmemory.au3>
#include <GUIConstantsEx.au3>
#Region ### START Koda GUI section ### Form=
$Form1 = GUICreate("Siktor's Tutorial", 266, 69, 192, 124)
$Label1 = GUICtrlCreateLabel("Made By Siktor", 184, 8, 76, 17)
$Checkbox1 = GUICtrlCreateCheckbox("Checkbox1", 8, 8, 97, 17)
$Button1 = GUICtrlCreateButton("Start", 8, 32, 251, 25)
GUISetState(@SW_SHOW)
#EndRegion ### END Koda GUI section ###
While 1
$nMsg = GUIGetMsg()
Switch $nMsg
Case $GUI_EVENT_CLOSE
Exit
Case $Button1
_hack()
EndSwitch
WEnd
Func _hack()
Adding Func of _hack()
So we are doing great till now, but does autoit understand what is _hack()?
Ofc no we need to add functions for that, there are a lot of ways to write these codes, there are complex ways, and easy ways, For E.x here is a kinda complex way which I personally use :
Code:
Func _Hack()
GUISetState(@SW_HIDE)
MsgBox ( 0, "title", "text" ) ; A Message Box that will appear after Clicking the start button.
$WAIT = ProcessWait("S4Client.exe"); This Function makes the program search for S4-Leauge
$PID = ProcessExists("S4Client.exe"); This means it found s4-league
$OPEN = _MemoryOpen ($PID)
If GUICtrlRead($Checkbox1) = 1 Then
_MemoryWrite(Address,$OPEN,"Value","Type") ; Address, Value, and type can be found by Cheat Engine or Address Searcher
EndIf
Exit
EndFunc
The Part which says $PID = ProcessExists("S4Client.exe"), I believe that that means instead of typing processExis.... we just named in by $PID, so as you can see in the next line it says $Open = _MemoryOpen ($PID) so instead of writting ProcessExists.. blablabla in the brackets he just wrote $Pid, also for the $Open = _MemoryOpen ($PID) he named it by $Open.
Truthfully I got this from Another tutorial but I edited some stuff, and explained some stuff, this is the tutorialClick Here. I took the Func _hack().
Anyway here is another easy way by lolkop :
Code:
Func _Hack()
If GUICtrlRead($Checkbox1) = 1 Then _MemoryWrite(Address,_MemoryOpen(ProcessWait("S4Client.exe")),"Value","Type")
Exit
EndFunc
I think nothing should be explained here, it is too easy actually.
Here is a third way by Virus.Bat :
Code:
Func _hack()
ToolTip('Waiting For s4-league..',0,0)
Processwait("S4Client.exe")
$P = ProcessExists("S4Client.exe")
Sleep(450)
$o = _MemoryOpen($P)
_MemoryWrite(Address,$o,'Value','long')
_MemoryClose($P)
exit
EndFunc
Ending Chapter 2
So let's check our codes, and give you address searcher!
You can find address searcher by searching in Elitepvpers or Google,
as for the codes it should look like this :
Code:
#cs ----------------------------------------------------------------------------
AutoIt Version: 3.3.10.2
Author: Siktor
Script Function:
Template AutoIt script.
#ce ----------------------------------------------------------------------------
#include <Nomadmemory.au3>
#include <GUIConstantsEx.au3>
#Region ### START Koda GUI section ### Form=
$Form1 = GUICreate("Siktor's Tutorial", 266, 69, 192, 124)
$Label1 = GUICtrlCreateLabel("Made By Siktor", 184, 8, 76, 17)
$Checkbox1 = GUICtrlCreateCheckbox("Checkbox1", 8, 8, 97, 17)
$Button1 = GUICtrlCreateButton("Start", 8, 32, 251, 25)
GUISetState(@SW_SHOW)
#EndRegion ### END Koda GUI section ###
While 1
$nMsg = GUIGetMsg()
Switch $nMsg
Case $GUI_EVENT_CLOSE
Exit
Case $Button1
_hack()
EndSwitch
WEnd
Func _Hack()
GUISetState(@SW_HIDE)
MsgBox ( 0, "title", "text" ) ;
$WAIT = ProcessWait("S4Client.exe"); This will make the hack search for s4League
$PID = ProcessExists("S4Client.exe"); This means he Found S4League
$OPEN = _MemoryOpen ($PID)
If GUICtrlRead($Checkbox1) = 1 Then
_MemoryWrite(Address,$OPEN,"Value","Type")
EndIf
Exit
EndFunc
In other way (Lolkop's way) :
Code:
#cs ----------------------------------------------------------------------------
AutoIt Version: 3.3.10.2
Author: Siktor
Script Function:
Template AutoIt script.
#ce ----------------------------------------------------------------------------
#include <Nomadmemory.au3>
#include <GUIConstantsEx.au3>
#Region ### START Koda GUI section ### Form=
$Form1 = GUICreate("Siktor's Tutorial", 266, 69, 192, 124)
$Label1 = GUICtrlCreateLabel("Made By Siktor", 184, 8, 76, 17)
$Checkbox1 = GUICtrlCreateCheckbox("Checkbox1", 8, 8, 97, 17)
$Button1 = GUICtrlCreateButton("Start", 8, 32, 251, 25)
GUISetState(@SW_SHOW)
#EndRegion ### END Koda GUI section ###
While 1
$nMsg = GUIGetMsg()
Switch $nMsg
Case $GUI_EVENT_CLOSE
Exit
Case $Button1
_hack()
EndSwitch
WEnd
Func _Hack()
If GUICtrlRead($Checkbox1) = 1 Then _MemoryWrite(Address,_MemoryOpen(ProcessWait("S4Client.exe")),"Value","Type")
Exit
EndFunc

In the koda codes there are some differences in the chapter 1 codes and the koda codes, but no problem we will be using the Koda Codes.
The Differences are in the Includes, it is auto named, and the part from the While 1 till the WEnd, here are my codes :
Code:
#include <GUIConstantsEx.au3>
#Region ### START Koda GUI section ### Form=
$Form1 = GUICreate("Siktor's Tutorial", 266, 69, 192, 124)
$Label1 = GUICtrlCreateLabel("Made By Siktor", 184, 8, 76, 17)
$Checkbox1 = GUICtrlCreateCheckbox("Inf Sp", 8, 8, 97, 17)
$Button1 = GUICtrlCreateButton("Start", 8, 32, 251, 25)
GUISetState(@SW_SHOW)
#EndRegion ### END Koda GUI section ###
While 1
$nMsg = GUIGetMsg()
Switch $nMsg
Case $GUI_EVENT_CLOSE
Exit
EndSwitch
WEnd
Add the our header before the beginning of the codes, and ill explain the most effective difference here,
See the Case $BUI_EVENT_CLOSE_Exit, is the function of the Close button on the top right which makes it when you press it close.
Main Lesson/Adding a new Include
Now let's start the main lesson, you will need Nomad Memory.au3, you gonna download it and put it in the includes folder in the Autoit Folder, and add a new Include which is
Code:
#Include <nomadmemory.au3>
Adding a Function for the Button
If you click on the button it won't do anything :/, so let's add a function for it,
In the While 1 Part, add this code after the Exit :Code:
Case $Button1
So if you noticed that we Used its name that is why naming is important.
Tip : If you want to add a simple function, like a Message Box, you can just put its code under the Case $Button1, since it doesn't have a lot of words and simple, but if you want to add a lot of functions like a message box, check box's function 2, and other functions like tool tip you better do what I am going to do in Section 2.
Section 1 - Simple Button Function
Under the Case $Button1, if you want for example to add a message box, you are going to add this code :
Code:
MsgBox ( flag, "title", "text" )
Flag : The flag indicates the type of message box and the possible button combinations. See remarks.
Title : The title of the message box.
Text : The text of the message box.
What is a Message box?
It is a pop-up message that tells you something.
Ill choose the flag 0, the tittle will be Attention, and the text is hacked, so our codes will look like this :
Code:
#cs ----------------------------------------------------------------------------
AutoIt Version: 3.3.10.2
Author: Siktor
Script Function:
Template AutoIt script.
#ce ----------------------------------------------------------------------------
#include <nomadmemory.au3>
#include <GUIConstantsEx.au3>
#Region ### START Koda GUI section ### Form=
$Form1 = GUICreate("Siktor's Tutorial", 266, 69, 192, 124)
$Label1 = GUICtrlCreateLabel("Made By Siktor", 184, 8, 76, 17)
$Checkbox1 = GUICtrlCreateCheckbox("Checkbox1", 8, 8, 97, 17)
$Button1 = GUICtrlCreateButton("Start", 8, 32, 251, 25)
GUISetState(@SW_SHOW)
#EndRegion ### END Koda GUI section ###
While 1
$nMsg = GUIGetMsg()
Switch $nMsg
Case $GUI_EVENT_CLOSE
Exit
Case $Button1
MsgBox ( 0, "Attention", "Hacked" )
EndSwitch
WEnd
Note : If you want to test it click on F5 and click on the button

Section 2 - Advanced Button Function
We've added simple function which was only a simple Message Box, now let's add a multi-function, underCase $Button1 type this : _a word(), of course we will not write a word, by a word here I mean any word like for E.x : hack, so we will write it like this _hack(), if you would like it another word do it the word you like, but I'll use hack, now under WEnd Press enter to go one line do (if you want it more organized press enter to times so you would be far from the WEnd) now type this : Func _hack(), so here we are going to type the function, of course Func stands for function and the _hack() the word a chose, if you have chose another work like _start() so it will be Func _start(), press enter after Func _hack(), so our code will look like this :Code:
#cs ----------------------------------------------------------------------------
AutoIt Version: 3.3.10.2
Author: Siktor
Script Function:
Template AutoIt script.
#ce ----------------------------------------------------------------------------
#include <nomadmemory.au3>
#include <GUIConstantsEx.au3>
#Region ### START Koda GUI section ### Form=
$Form1 = GUICreate("Siktor's Tutorial", 266, 69, 192, 124)
$Label1 = GUICtrlCreateLabel("Made By Siktor", 184, 8, 76, 17)
$Checkbox1 = GUICtrlCreateCheckbox("Checkbox1", 8, 8, 97, 17)
$Button1 = GUICtrlCreateButton("Start", 8, 32, 251, 25)
GUISetState(@SW_SHOW)
#EndRegion ### END Koda GUI section ###
While 1
$nMsg = GUIGetMsg()
Switch $nMsg
Case $GUI_EVENT_CLOSE
Exit
Case $Button1
_hack()
EndSwitch
WEnd
Func _hack()
Adding Func of _hack()
So we are doing great till now, but does autoit understand what is _hack()?
Ofc no we need to add functions for that, there are a lot of ways to write these codes, there are complex ways, and easy ways, For E.x here is a kinda complex way which I personally use :
Code:
Func _Hack()
GUISetState(@SW_HIDE)
MsgBox ( 0, "title", "text" ) ; A Message Box that will appear after Clicking the start button.
$WAIT = ProcessWait("S4Client.exe"); This Function makes the program search for S4-Leauge
$PID = ProcessExists("S4Client.exe"); This means it found s4-league
$OPEN = _MemoryOpen ($PID)
If GUICtrlRead($Checkbox1) = 1 Then
_MemoryWrite(Address,$OPEN,"Value","Type") ; Address, Value, and type can be found by Cheat Engine or Address Searcher
EndIf
Exit
EndFunc
The Part which says $PID = ProcessExists("S4Client.exe"), I believe that that means instead of typing processExis.... we just named in by $PID, so as you can see in the next line it says $Open = _MemoryOpen ($PID) so instead of writting ProcessExists.. blablabla in the brackets he just wrote $Pid, also for the $Open = _MemoryOpen ($PID) he named it by $Open.
Truthfully I got this from Another tutorial but I edited some stuff, and explained some stuff, this is the tutorialClick Here. I took the Func _hack().
Anyway here is another easy way by lolkop :
Code:
Func _Hack()
If GUICtrlRead($Checkbox1) = 1 Then _MemoryWrite(Address,_MemoryOpen(ProcessWait("S4Client.exe")),"Value","Type")
Exit
EndFunc
I think nothing should be explained here, it is too easy actually.
Here is a third way by Virus.Bat :
Code:
Func _hack()
ToolTip('Waiting For s4-league..',0,0)
Processwait("S4Client.exe")
$P = ProcessExists("S4Client.exe")
Sleep(450)
$o = _MemoryOpen($P)
_MemoryWrite(Address,$o,'Value','long')
_MemoryClose($P)
exit
EndFunc
Choose the way you like and use it!
Ending Chapter 2
So let's check our codes, and give you address searcher!
You can find address searcher by searching in Elitepvpers or Google,
as for the codes it should look like this :
Code:
#cs ----------------------------------------------------------------------------
AutoIt Version: 3.3.10.2
Author: Siktor
Script Function:
Template AutoIt script.
#ce ----------------------------------------------------------------------------
#include <Nomadmemory.au3>
#include <GUIConstantsEx.au3>
#Region ### START Koda GUI section ### Form=
$Form1 = GUICreate("Siktor's Tutorial", 266, 69, 192, 124)
$Label1 = GUICtrlCreateLabel("Made By Siktor", 184, 8, 76, 17)
$Checkbox1 = GUICtrlCreateCheckbox("Checkbox1", 8, 8, 97, 17)
$Button1 = GUICtrlCreateButton("Start", 8, 32, 251, 25)
GUISetState(@SW_SHOW)
#EndRegion ### END Koda GUI section ###
While 1
$nMsg = GUIGetMsg()
Switch $nMsg
Case $GUI_EVENT_CLOSE
Exit
Case $Button1
_hack()
EndSwitch
WEnd
Func _Hack()
GUISetState(@SW_HIDE)
MsgBox ( 0, "title", "text" ) ;
$WAIT = ProcessWait("S4Client.exe"); This will make the hack search for s4League
$PID = ProcessExists("S4Client.exe"); This means he Found S4League
$OPEN = _MemoryOpen ($PID)
If GUICtrlRead($Checkbox1) = 1 Then
_MemoryWrite(Address,$OPEN,"Value","Type")
EndIf
Exit
EndFunc
In other way (Lolkop's way) :
Code:
#cs ----------------------------------------------------------------------------
AutoIt Version: 3.3.10.2
Author: Siktor
Script Function:
Template AutoIt script.
#ce ----------------------------------------------------------------------------
#include <Nomadmemory.au3>
#include <GUIConstantsEx.au3>
#Region ### START Koda GUI section ### Form=
$Form1 = GUICreate("Siktor's Tutorial", 266, 69, 192, 124)
$Label1 = GUICtrlCreateLabel("Made By Siktor", 184, 8, 76, 17)
$Checkbox1 = GUICtrlCreateCheckbox("Checkbox1", 8, 8, 97, 17)
$Button1 = GUICtrlCreateButton("Start", 8, 32, 251, 25)
GUISetState(@SW_SHOW)
#EndRegion ### END Koda GUI section ###
While 1
$nMsg = GUIGetMsg()
Switch $nMsg
Case $GUI_EVENT_CLOSE
Exit
Case $Button1
_hack()
EndSwitch
WEnd
Func _Hack()
If GUICtrlRead($Checkbox1) = 1 Then _MemoryWrite(Address,_MemoryOpen(ProcessWait("S4Client.exe")),"Value","Type")
Exit
EndFunc
Virus.Bat's way you figure it your self, I think that is enough it is easy.
Chapter 3
Adding Cool Stuff to the trainer
Introduction
We've made our trainer, and maybe it has good functions, but bad design, so why don't we improve it, we will add a picture, and an Audio.
Lesson 1How to add a picture
A lot of people think that when you add a picture in Koda, that is how to add a picture, actually no, if you just add a picture in Koda, it will only appear for you but not for others, Koda helps you by making you see how it looks like in your GUI.
Step 1
Open Koda, go to additional tab beside the Standard tab,

Step 2
Click Squared Picture Icon beside the mouse icon.

Step 3
Now go into the Form and click and hold the left mouse button, drag your mouse till you make the dimensions you would like.
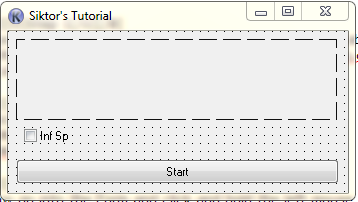
Step 4
A new box will appear, double click on it, a new window will pop-out, you will see a button called "load", just click on it, find your picture and double click on it.
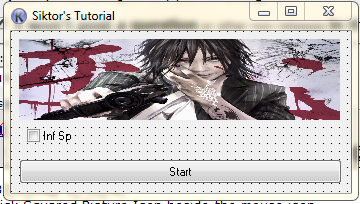
We've finished Koda part, but now if you share your trainer it won't appear for other users, so let's do these steps in order to make it appear

Step 1
Copy the codes by clicking on the shortcut F9 and paste em in a Autoit Script.
Step 2
The part of the picture codes will look like this [Not the same] :
Code:
$Pic1 = GUICtrlCreatePic("C:UsersuserDesktopDesktopPicsHD-Anime-Gun.jpg", 8, 8, 321, 81)
Erase this part but keep the dimensions, my dimensions are , 8, 8, 321, 81) your will be different so just keep em.
Step 3
Just before the dimensions put these codes :
Code:
$Pic1 = GUICtrlCreatePic(@ScriptDir & "pic.jpg",
So it will look like this :
Code:
$Pic1 = GUICtrlCreatePic(@ScriptDir & "pic.jpg", 8, 8, 321, 81)
Step 4
If you click F5 to show your trainer, you will notice that the picture has dis appeared, what you need to do is this :
In this part of the codes :
Code:
(@ScriptDir & "pic.jpg",
Instead of pic.jpg" name the pic.jpg the name of your picture, so if your picture is named NarutoHD, so name it NarutoHD.jpg so it will look like this :
Code:
$Pic1 = GUICtrlCreatePic(@ScriptDir & "NarutoHD.jpg", 8, 8, 321, 81)
Finally put the picture in the same folder of your trainer, and press F5

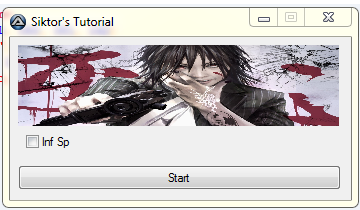
Your codes will look like this [You will have different dimensions] :
Code:
#include <GUIConstantsEx.au3>
#Region ### START Koda GUI section ### Form=
$Form1 = GUICreate("Siktor's Tutorial", 341, 163, 381, 162)
$Checkbox1 = GUICtrlCreateCheckbox("Inf Sp", 16, 96, 49, 17)
$Button1 = GUICtrlCreateButton("Start", 8, 128, 323, 25)
$Pic1 = GUICtrlCreatePic(@ScriptDir & "NarutoHD.jpg", 8, 8, 321, 81)
GUISetState(@SW_SHOW)
#EndRegion ### END Koda GUI section ###
While 1
$nMsg = GUIGetMsg()
Switch $nMsg
Case $GUI_EVENT_CLOSE
Exit
EndSwitch
WEnd
A lot of people think that when you add a picture in Koda, that is how to add a picture, actually no, if you just add a picture in Koda, it will only appear for you but not for others, Koda helps you by making you see how it looks like in your GUI.
Step 1
Open Koda, go to additional tab beside the Standard tab,

Step 2
Click Squared Picture Icon beside the mouse icon.

Step 3
Now go into the Form and click and hold the left mouse button, drag your mouse till you make the dimensions you would like.

Step 4
A new box will appear, double click on it, a new window will pop-out, you will see a button called "load", just click on it, find your picture and double click on it.

We've finished Koda part, but now if you share your trainer it won't appear for other users, so let's do these steps in order to make it appear

Step 1
Copy the codes by clicking on the shortcut F9 and paste em in a Autoit Script.
Step 2
The part of the picture codes will look like this [Not the same] :
Code:
$Pic1 = GUICtrlCreatePic("C:UsersuserDesktopDesktopPicsHD-Anime-Gun.jpg", 8, 8, 321, 81)
Erase this part but keep the dimensions, my dimensions are , 8, 8, 321, 81) your will be different so just keep em.
Step 3
Just before the dimensions put these codes :
Code:
$Pic1 = GUICtrlCreatePic(@ScriptDir & "pic.jpg",
So it will look like this :
Code:
$Pic1 = GUICtrlCreatePic(@ScriptDir & "pic.jpg", 8, 8, 321, 81)
Step 4
If you click F5 to show your trainer, you will notice that the picture has dis appeared, what you need to do is this :
In this part of the codes :
Code:
(@ScriptDir & "pic.jpg",
Instead of pic.jpg" name the pic.jpg the name of your picture, so if your picture is named NarutoHD, so name it NarutoHD.jpg so it will look like this :
Code:
$Pic1 = GUICtrlCreatePic(@ScriptDir & "NarutoHD.jpg", 8, 8, 321, 81)
Finally put the picture in the same folder of your trainer, and press F5


Your codes will look like this [You will have different dimensions] :
Code:
#include <GUIConstantsEx.au3>
#Region ### START Koda GUI section ### Form=
$Form1 = GUICreate("Siktor's Tutorial", 341, 163, 381, 162)
$Checkbox1 = GUICtrlCreateCheckbox("Inf Sp", 16, 96, 49, 17)
$Button1 = GUICtrlCreateButton("Start", 8, 128, 323, 25)
$Pic1 = GUICtrlCreatePic(@ScriptDir & "NarutoHD.jpg", 8, 8, 321, 81)
GUISetState(@SW_SHOW)
#EndRegion ### END Koda GUI section ###
While 1
$nMsg = GUIGetMsg()
Switch $nMsg
Case $GUI_EVENT_CLOSE
Exit
EndSwitch
WEnd
Lesson 2
How to add audio to your script.
This is so simple, actually it doesn't need a tutorial, ill just post it for noobs :l
Here are the functions, no need for explain, if you've learnt what is up you can do this easily :
Code:
#include <Sound.au3>
$handle = _SoundOpen(@ScriptDir & "yoursound.mp3")
_SoundPlay($handle)
Chapter 4
Undetected Funcion
So we've made our trainer, with pictures and audio and we are ready to use, but how to make it undetected?
Truthfully autoit isn't the best for making hacks, I just use it since it is easy for me.
Let's start
Tutorial
We will need a new program, which is resource hacker, you will find it here.
Step 1
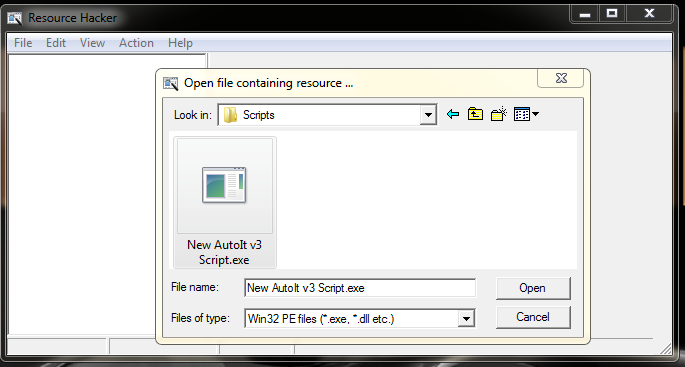
Compile your trainer and open resource hacker.
Step 2
Click on file, open and choose your compiled script which is .exe
And the last thing you need to do is to make it undetected:
What we need:
http://www.angusj.com/resourcehacker/reshack_setup.exe
1.Step:
Download Resource Hacker and install it. Make an AutoIt Script.
Here an Example (only GUI):
Code:
#include <ButtonConstants.au3>
#include <GUIConstantsEx.au3>
#include <WindowsConstants.au3>
#Region ### START Koda GUI section ### Form=
$TestGUI = GUICreate("Test", 174, 142, 192, 124)
$TestButton = GUICtrlCreateButton("Test", 12, 13, 138, 102, 0)
GUISetState(@SW_SHOW)
#EndRegion ### END Koda GUI section ###
While 1
$nMsg = GUIGetMsg()
Switch $nMsg
Case $GUI_EVENT_CLOSE
Exit
EndSwitch
WEnd
2.Step:
Start Resource Hacker. Go to File -> Open and select now your Trainer (.exe not .au3!!!)

3.Step:
Then click on "Version Info" -> 1 ->2057, there your see something like: "AutoIt v3 Script 3, 3, 8, 1", change that to "xxxxxx" and then click "Compile Script"
Screen:

4.Step:
Then you go to File -> Save and save your Trainer, now open S4 and now shouldn't pop up any X-Trap!
Credits:
Step 1
Compile your trainer and open resource hacker.
Step 2
Click on file, open and choose your compiled script which is .exe

And the last thing you need to do is to make it undetected:
What we need:
http://www.angusj.com/resourcehacker/reshack_setup.exe
1.Step:
Download Resource Hacker and install it. Make an AutoIt Script.
Here an Example (only GUI):
Code:
#include <ButtonConstants.au3>
#include <GUIConstantsEx.au3>
#include <WindowsConstants.au3>
#Region ### START Koda GUI section ### Form=
$TestGUI = GUICreate("Test", 174, 142, 192, 124)
$TestButton = GUICtrlCreateButton("Test", 12, 13, 138, 102, 0)
GUISetState(@SW_SHOW)
#EndRegion ### END Koda GUI section ###
While 1
$nMsg = GUIGetMsg()
Switch $nMsg
Case $GUI_EVENT_CLOSE
Exit
EndSwitch
WEnd
2.Step:
Start Resource Hacker. Go to File -> Open and select now your Trainer (.exe not .au3!!!)

3.Step:
Then click on "Version Info" -> 1 ->2057, there your see something like: "AutoIt v3 Script 3, 3, 8, 1", change that to "xxxxxx" and then click "Compile Script"
Screen:

4.Step:
Then you go to File -> Save and save your Trainer, now open S4 and now shouldn't pop up any X-Trap!
Credits:
- Siktor or "v" -> Wrote most of the tutorial.
- TheForsaken -> Chapters Style, Copied from him some Lines <3.
- K1ramoX -> Introduction thread style.
- lolkop, Virus.Bat, and MinoriMiku -> Func _hack()


